Americas Canada Travels

General Mountaineering Camp – Selkirk Mountains – Part 2

July 31, 2012

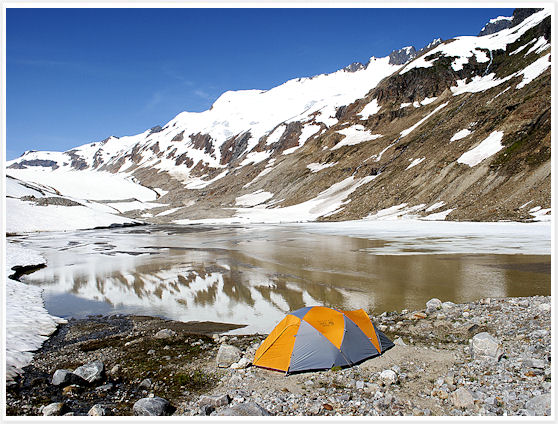
Now that I’ve filled you in on a typical day at the GMC, I’ll let a few more pictures of my ascents and active “days off” speak for themselves as to the astounding beauty of the scenery and learning experience this mountaineering camp truly was.

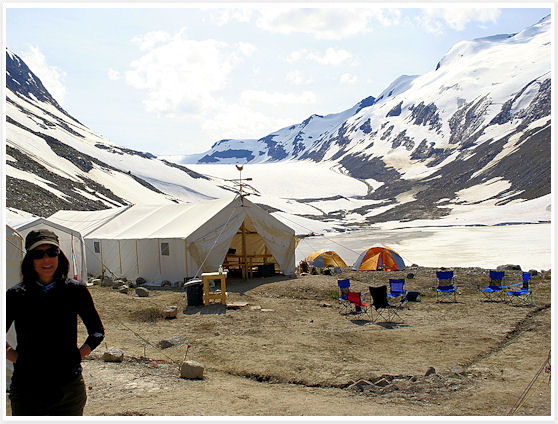
Late morning (i.e. 7:30am!) sunrise on the camp

Walking along the cornice to my first summit of the week, Alpina Dome, an easy 7,829 ft.

Red snow phenomenon increasing in visibility as the week went on and the temperature rose. It’s caused by an algae and smells of fresh watermelon…no kidding!

Looking towards Hawthorne Glacier as we were walking up to Belvedere Peak

Our camp as seen from high above

Snow field way up – makes you want to run across but these are the ones you need to be extra careful with (hidden crevasse anyone?)

A rare shot as I’m nearing my highest summit of the week, Belvedere Peak, 9,770 ft. We’re usually too busy rock climbing with our hands full at this point to stop and take a photo, but after such a climb I felt it deserved being recorded!

A surprise was hidden at the summit: an old and rusty sardine tin stuck in a plastic container, holding scribbled names of the climbers who’ve reached the Belvedere Peak before us. How cool is that? I’ve put down my name of course…finally immortalized! 😉

Taking a sun break on Belvedere Peak, staring at Mt Sir Sandford. I’ll never get sick of this view.

Another view from Belvedere Peak (can you guess now this was my favorite climb of the week?) – just the Rockies ad infinitum…

The other side of Belvedere was neighboring Blackfriars Peaks.

Sure, you can join the GMC like the majority of our group and go straight off climbing mountains on your first day there like you’ve done for many years, but us ‘newbies’ needed to attend ‘snow and ice school’ which is a very cool and very hands-on day where you learn everything from tying a bunch of knots to stopping yourself from a fall with your ice axe to building a snow anchor as shown below.

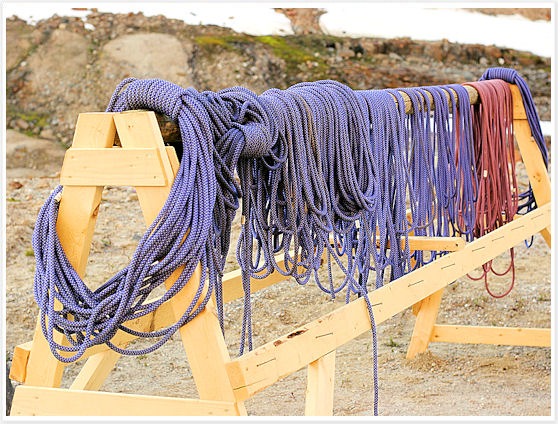
There are also ‘days off’ where if you don’t feel like challenging yourself to a big peak, you can always attend the ‘rock school’ – so much better than learning rock climbing indoors! I honestly cannot think of a more perfect or beautiful setting.

Rappelling was the easiest with my chunky mountaineering boots, the climbing not so much!

Another favorite activity on a day off (OK, I took two!) is to go hiking around the camp, there’s still much to see and do at low altitude.

Since it’s a day off you tend to look more closely at things, like flora and fauna (we did see a sort of silver alpine marmot too).

The hike has mainly two purposes: visiting the only permanent alpine hut in the vicinity and getting closer to Sir Sandford, the magnificent mountain in the background.

A close-up of Sir Sandford. That same day, a few of our best climbers went on a recon expedition (left at 2am) to see if an ascent of Sir Sandford would be possible. Alas, the snow was giving way, too dangerous to attempt until it freezes again!

The Great Cairn Ben Ferris Hut is a spectacularly positioned hut from the Alpine Club of Canada, facing Sir Sandford, and was just around the corner from our camp. You’d need a solid day of mountaineering to access it in the summer or a helicopter ride in the winter.

On my last day I climbed Palisade Mountain which still hadn’t been explored that week so we had no idea what to expect! It was the perfect end to the week as it revisited everything we learned and challenged us by offering a mix of: steep rock scrambling and climbing, some snow, some slippery grass, good amount of exposure, a long and narrow ridge and of course splendid views all around.

First climbers always encounter bottlenecks when the path needs to be cleared (or created in this case!).

Another view of Sir Sandford and a gigantic glacier as seen from Palisade.

Sadly, the week eventually came to an end and with it arrived the helicopter to take us all down to civilization.

Our volunteer guides waved us goodbye as they were getting the camp ready for the other group of climbers arriving any minutes now.

My final and last view of the camp, but definitely not my last mountaineering week!


Americas Canada Travels

General Mountaineering Camp – Selkirk Mountains – Part 1

July 26, 2012

Camp intro

While everyone was suffering from the heat waves relentlessly hitting the US, I was heading north to cool off by joining the 2012 General Mountaineering Camp with the Alpine Club of Canada. Located this year in the Sir Sandford area of the Selkirk mountains, my friend and I met the group in Golden, BC before driving one hour north to the helicopter staging area that would bring us to the base camp, our home for the next 7 days.

GMC 2012 - Helicopter

With a prime seat at the front next to the pilot, I got sweeping views of the area, heading up towards the snowy peaks before landing a short 5 minutes later at the base camp some 7,000 ft in altitude.

GMC - Helicopter

GMC 2012 - Helicopter

The scene was spectacular, looking down at all these bright orange tents waiting for us, sparkly snow, rugged mountains and shiny glaciers surrounding it all.

GMC Camp 2012

GMC 2012 Camp - tents

The set up and organization were impressive: large communal area with kitchen, big dining tent, a tea room for rainy days, …

GMC 2012 Camp - tents

… built-up toilets and hand washing station…

GMC 2012 - Toilets

…and the most stunning and wild landscape I had ever camped in.

GMC Camp 2012 - Glacier

I realize very few people know what a Mountaineering Camp is so I’ll highlight one of our typical days below:

No surprise, wake-up time is early, between 4:30am and 7am if you’re having a lazy one. The air is crisp and wonderfully invigorating and the light from the rising sun is just gorgeous!

You get all your gear packed up and head to the main tent for a big breakfast – warm porridge every morning with a fruit salad to which they add a new main dish every day such as pancakes and bacon, frittata, scones, french toast, etc. served with coffee/tea – a very filling start for the active day ahead!

The rope teams (there are usually 3-4 different climbs each day which you pick the night before) gather for a briefing and an equipment check before heading out.

GMC Camp 2012 - Rope Teams

Then it’s on your way to the peaks, usually starting by crossing a large glacier or going straight up through some rock scrambling.

GMC Camp - Rope Teams

You soon realize all that gear you’re carrying has its use – out the ice axe and ski poles for helping with the balance and getting you out of unexpected sink holes.

One of many fuel breaks on the way to the peak where you have a short time to eat a snack (you would have packed yourself a pretty big lunch last night!), take in the scenery and often shorten the ropes (taking in coils as they say here) if you’re about to go through a risky patch.

At some point between 11am-1pm you’ll finally reach the summit, the ultimate goal of your day and an excuse for a very scenic lunch break. You’re now about 9,000-10,000 feet up high and though the views are different from every peak, all are spectacular especially considering we probably had THE best weather that has ever been seen at week one of a GMC.

After a more than decent lunch break and plenty of pictures, time to go down already as the sun is pretty strong and the snow and ice are at the melting point. Going down in the snow isn’t as easy as it looks (heels in first folks!) so we try as best to keep it controlled and balanced…

…though sometimes you just can’t avoid the occasional butt slide! I don’t need to tell you how much fun this is (and how much quicker!), well as long as the end of the slope is clear and not a massive drop down into a crevasse! Talk about being a kid in an adult playground.

The walk back to the camp in mid-afternoon is a hot one and at this point, all you’re thinking about is taking off your boots, shedding some more layers and…

… getting in queue for the outdoor shower.

Before getting into leisure mood though, take time to put the gear out to dry…it’s been a wet day in all shapes and forms.

GMC Camp 2012 - Ropes

The two to three hours you have left in the afternoon before dinner are spent as you like, usually getting cleaned up, taking a nap, reading a bit, chatting about your day’s adventures to the different teams sporadically making their way back to camp, eating (again!), and for the lucky ones who thought about bringing alcohol, enjoying a well deserved cold beer or a glass of wine.

Dinner is usually promptly served around 6pm and it is everyone’s favorite time. Two large communal tables are welcoming hungry climbers inside the dining tent where our dedicated cooks have prepared a filling and tasty 3 course meal. There’s always soup as a starter, followed by a main meal with salad (lasagna, chicken with rice, mexican burrito, you name it) and of course a dessert.

When you’re finally satiated (and you will be with all this food), you take part in the lovely tradition of ‘story time’. This is where a member of each rope team stands up, puts a sort of pirate’s hat on with colorful feathers, and tell the tales of the day, how their climb went, any particular incidents or memorable quotes, etc. Trust me, with such adventure-packed days and colorful characters, they were all highly entertaining and showed the great camaraderie the GMC is famous for.

We usually linger a bit to chat before getting kicked out of the dining room to allow the cooks to lay out our lunch spread. We shortly get called back in to prepare our lunch for the next day (sandwiches, cookies, fruits, trek mix, etc.) and then everyone gathers around the tea tent, waiting for tomorrow’s climbs and rope teams to be announced. Once you know what you’ll be up to the next day, you simply go get your gear ready and yourself into bed.

It’s usually about 8:30pm by then and getting into your tent for the night isn’t easy…there’s still so much of that beautiful light out, striking the mountain tops with a vivid hue.

Light on Azimut

Light on Palissade

Tomorrow is another big day though so time to say good night, and anyway that sun isn’t setting down for a while… it’s still slightly light out at midnight over here!

Dessert Recipes Vegetarian

Sweet Ricotta Pudding with Roasted Grapes

July 21, 2012

It would take more than the dog days of summer to stop me from having my daily dose of dessert and sweets, though I can appreciate that chocolate and heavy cakes don’t fare well in this weather either. Come July and August I turn to the bounty of fresh fruits and lighter baked goods to curb my cravings and this Ricotta Pudding is just the right thing for now.

You’ll love this if you’re more of a cheese course type than a cupcake fan. The pudding (which is really more like a flan) is light and soft though still rich and creamy and you’ll want a fruity topping to add a bit of sweetness as it is pretty mild on its own. The roasted grapes in this recipe are great, though you could substitute any berries or stone fruits, a drizzle of honey, or even a chocolate sauce, whatever suits you really since this is a pretty versatile base.

The baked pudding will come out of the oven puffed up but will soon deflate and collapse. You want to make sure you’re using fresh ricotta to keep it airy as a commercial one would probably leave you with a firmer texture than you’d like. Serve it at room temperature with the topping of your choice, and eat the leftovers for breakfast, it’s delicious the following morning! I’m already thinking of doing a savory incarnation, perhaps tomatoes and basil, and skip on the sugar…

Sweet Ricotta Pudding with Roasted Grapes

Adapted from Gourmet Magazine
Active time: 15 min
Total time: 1 hr
Makes 6 servings
 
2 tablespoons unsalted butter, melted, divided
1 tablespoon plain fine dry bread crumbs
1 2/3 cups whole-milk ricotta (15 ounces)
2 large eggs
1/4 teaspoon cinnamon
1/8 teaspoon salt
5 tablespoons sugar, divided
1 1/2 tablespoons pine nuts, toasted2 cups red seedless grapes (3/4 pound), halved
1 tablespoon balsamic vinegar
 

Preheat oven to 375°F with racks in middle and lower third.

Butter a 9-inch glass or ceramic pie plate with some of butter, then spread bread crumbs in plate to coat.

Ricotta Pudding

Blend ricotta, eggs, cinnamon, salt, and 3 tablespoons sugar in a blender until very smooth, about 2 minutes. Pour batter into pie plate and sprinkle with nuts.

Ricotta Pudding

Bake in middle of oven until puffed, golden, and just set, about 25 minutes. Cool pudding on a rack.

Ricotta Pudding

While pudding bakes, toss grapes with remaining butter, remaining 2 tablespoons sugar, and vinegar in a small shallow baking pan and let macerate.

Ricotta Pudding

Increase oven temperature to 425°F.

Roast grapes in lower third of oven, shaking pan occasionally, until tender but not falling apart, 10 to 12 minutes. Cool grapes until just warm and serve alongside pudding.

Ricotta Pudding

Ricotta Pudding

[print_link]


Americas Canada Travels

The Canadian Rockies

July 18, 2012

It’s been a little while…and it was all for a good reason. If you’ve never made it to Western Canada and the Rockies (I’m Canadian and this was my first trip out there, shame on me!), I hope the following posts will convince you to hop on a plane and immerse yourself in some of the most striking natural landscapes I’ve seen.

The ultimate destination was a Mountaineering Camp high up in British Columbia, but since I was flying all the way into Calgary, I had to get a taste of all the major tourist sites around before leaving civilization for a bit. We spent our first night in Banff and woke up to an incredibly invigorating fresh and crisp air, so divine after the never-ending heat waves that have hit NYC lately.

Banff Avenue

We didn’t stick around too long, just enough to get a glimpse of Banff Avenue, lined with rustic looking restaurants serving Bison and other Canadian specialties, tourist shops selling maple products and stuffed elks, and all that makes a proper resort town’s main drag. The view of the Rockies on each side makes you realize how far you are from your own concrete jungle…

We hopped on a guided tour of the main sites around organized by Explore Rockies for the day. On top of seeing up close some pretty cool wildlife on the side of the highway such as elks and the cutest black bear, here are some of the beautiful sites we briefly stopped by:

Johnston Canyon: A short hike to the Lower Falls allowed us to witness the power of nature and time where rushing water flows through a large canyon formed by erosion over thousands of years. It’s a popular hike in Banff National Park and the scenery of gorgeous waterfalls, emerald water and sheer cliff walls is definitely worth the easy walk up.

Johnston Canyon

Johnston Canyon

Castle Mountain: Only a quick photo stop on the road for this aptly named mountain shaped like a fortress. Its majestic peaks can be seen  from far away on the Trans-Canada highway.

Castle Mountain

Lake Louise: The “Jewel of the Canadian Rockies” is a glacial lake with the now familiar emerald color you see across the region. It actually comes from rock flour carried into the lake by the melting glaciers above. The Fairmont Chateau Lake Louise sits on the eastern shore and you can take a nice little stroll as we did around the lake and photograph the famous Victoria Glacier. It’s a popular skiing area in the winter and summer sees hikers taking over the various trails leaving from around the lake.

Lake Louise

Lake Louise

Moraine Lake: My favorite site, I could have sit here and stare at it all day. The incredible blue seems almost fake and I can hardly recall a more photogenic scene in my travels. If you’ve never heard its name, you’ve surely seen it somewhere as it is world famous and made appearances on Canadian twenty dollar bills and as a background on various operating systems on your BB, Android, Windows, etc. I much prefer seeing it in real where it is even more stunning, sitting in the Valley of the Ten Peaks in the most gorgeous color contrast you can imagine.

Moraine Lake

Takakkaw Falls: The second highest waterfall in Canada located in Yoho National Park, it boasts a pretty impressive ‘free-fall’ which must be at its peak now with the glaciers melting heavily in the summer.

Takakkaw Falls

Takakkaw Falls

Our tour was now over but our adventure was only beginning… We kindly asked the bus driver to drop us on the highway, hoping to catch a lift to our next destination: Golden.

Fields

Golden

TBC…

Appetizer Recipes

Creole mini meat pies

July 5, 2012

With summer inevitably comes backyard BBQs and the need for some tasty finger food to enjoy out on the patio. These tiny Creole mini meat pies are the perfect addition to your spread and best enjoyed eaten with one hand while holding a cold beer in the other.

The ground beef is cooked with herbs and a bit of chili powder for that little kick and Creole flavor. The use of frozen puff pastry sheets makes these savory bites a quick hors d’oeuvres to put together and can even be prepared in advance – just pop them in the oven when your guests have arrived. Delicious on their own, they get truly addictive with a spicy mustard dip on the side.

Creole mini meat pies

Adapted from Creole
Active time: 20 minutes
Total time: 40 minutes
Makes 4 servings (8 mini pies)
 
2 tablespoons sunflower oil
1 sprig flat-leaf parsley, finely chopped
Pinch chili powder
2 cloves garlic, finely chopped
1 shallot, finely chopped
4 scallions, finely chopped
1 cup (250g) ground beef
Salt and black pepper
All-purpose flour, for dusting
1 roll puff pastry
1 egg, lightly beaten
 

Heat the oil in a heavy-based saucepan then gently fry the parsley, chili powder, garlic, shallot and scallions for 2 minutes.

Creole Mini Meat Pies

Add the ground beef, stirring vigorously to mix thoroughly. Season to taste with salt and pepper. Cook for 4 to 5 minutes more then remove from heat and set aside to cool.

Creole Mini Meat Pies

Sprinkle the work surface with a little flour then spread out the puff pastry. Using a pastry cutter, cut out approximately 16 2¼inch (6cm) circles.

Creole Mini Meat Pies

Preheat oven to 350°F (180°C). Place a tablespoonful of the cooled filling in the middle of half of the pastry discs, then cover with the remaining discs. Seal the edges well using a fork.

Creole Mini Meat Pies

Brush the egg over each pie. Bake for 15 to 20 minutes.

Creole Mini Meat Pies

Creole Mini Meat Pies

[print_link]